

The Post and Photos within may contain Amazon or other affiliate links. If you purchase using links in this post I do earn a small commission but without additional charge to you. Thank you for your support!

WOW ! There is a new Cricut cartridge…All Occasion Box Cards by designer Lori Whitlock. I have been a fan of Lori’s work for a long time now and was so excited to see that she partnered with Cricut. You can find more of her wonderful SVG designs available for purchase at Lori Whitlock SVG Shop.
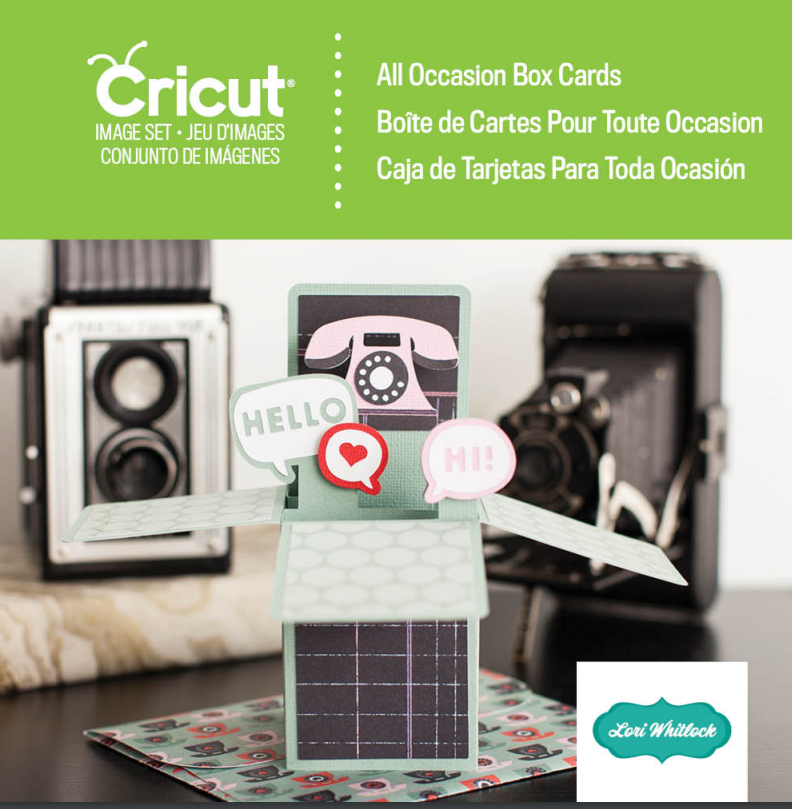
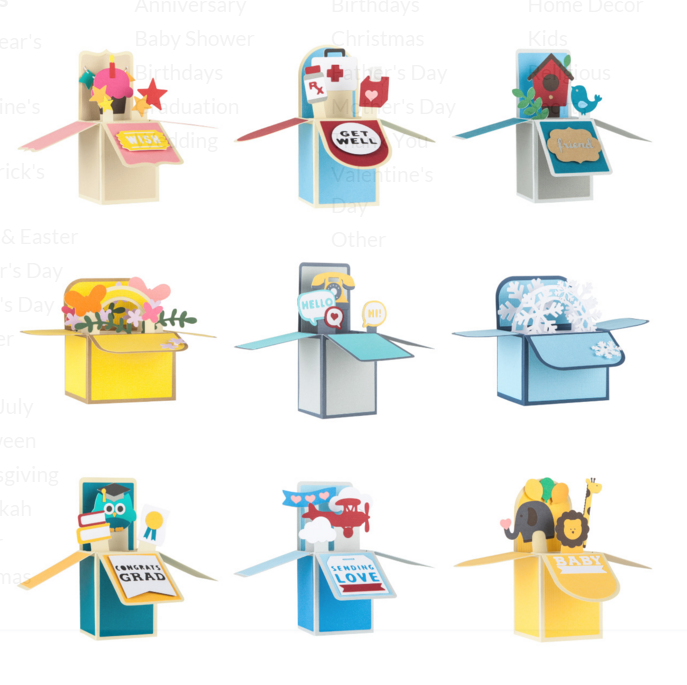
All Occasion Box Cards has 30 Box Card Designs from designer, Lori Whitlock. Thanks for using my link to purchase @ http://bit.ly/1OiFfsf Plus get 10% off and free USA shipping with promo code happycrafting through January 31st 2016. (Select HOME DELIVERY option under Fex Ex.)
• Contains 30 box card designs and coordinating envelopes for any occasion
• Create multilayer 3D projects full of color and joy to brighten any day
• Ideal for birthdays, holidays, graduation, weddings, and everything in-between!
• Use with all Cricut® electronic cutting machines
These box cards are adorable ! There are two different styles…vertical or horizontal. Here is a just a few of them. I can’t wait to make them all !
Now if you are a Cricut Explore user, you may want some help figuring out how to size these in Design Space. Watch my Cricut All Occasion Box Cards Cartridge Tutorial. I share tips for locating, purchasing, sizing the box cards in Cricut Design Space and assembling instructions to help you create these yourself easily.
Again, thanks for using my link to purchase All Occasion Box Cards @ http://bit.ly/1OiFfsf Don’t forget to use the promo code happycrafting through January 31st 2016 to receive 10% off and free USA shipping by selecting HOME DELIVERY option under Fed Ex.
I have some new classes coming out soon. Read about those HERE. Thanks for stopping by. Be sure and join us over at Lets Learn Cricut Explore Facebook Group for learning, sharing and having fun with Cricut Explore and Design Space. Happy Creating ! Debbie

Hi Debbie
I was on the fence about purchasing this set but after seeing your video I HAD to have it!! Thank you so much for sharing your work and talent and for the opportunity to buy this with a great discount. Looking forward to learning a lot from you!
Linda 🙂
You are so welcome Linda. I hope you enjoy making the box cards ! They are so much fun 🙂 Debbie
Wow, thanks for the great video. I remember you from the Cricut message boards. I always enjoyed your posts. Thanks for doing this video. I made my first box card from this cartidge last night. Great cartidge and great instructions.
Thanks,
Karen
Hi Karen – Thanks for the kind words ! And I always enjoy connecting with former Cricut message board members..I miss those days. Debbie
Hi Debbie. So I purchased this cartridge I want to personalize my own pop up card the inset has templates from the already made cards. Is there a way I can slice them. Please help me. Thanks u
Hi Blanche …Well you could personalize it by slicing off the part of the image you don’t want in Design Space. Just add an image box (use the free insert shapes one), expand it until it covers the area you want to slice off. Then use the slice feature in the layers panel to cut it off the digital image. Another way would be to not use the insert with that cartridge and just make your own without the image on it to use by creating a rectangle, sizing it to make the length and adding score lines to it in the same places the cartridge insert shows. Hope this helps give you some ideas. Debbie
Ok I watched your tutorial and I resize it to the 5.5 using your method with the square shape. When I hit go it tells me to resize my image because it is too big for the mat. What do I do now?
Thanks
Kay